
You are going to need the FABULOUS FINDS Cricut Cartridge. {These can be cut by hand, but the Cricut makes it easy and calculates all the dimensions for you.} In the booklet, turn to page 127. I cut the lower one, the one that is more square and true the matchbook shape. Set the dial size to 4". I know they usually are smaller than this, but I am going to be putting wallet sized photos of my daughter in this and I didn't want to have to cut any of them down, PLUS 4" leaves room for journaling and embellishments.

For the cover, I cut it on BLACK OUT because I wanted to create my own cover. If you do not cut it this way, it will cut a window in the cover for you, which is nice, but not what I wanted. This is your choice, though. I used Bazzill Raven colored textured card stock for the cover, then I used paper from Rusty Pickle: Pirate Princess paper collection for the inner pages of the book. I am in ♥ with this paper! Since I wanted the book to fun and all with pictures of my daughter, I knew this was the paper for the project! {You can cut as many pages for the inside that you would like. I cut 5 inserts, this will give me a total of 20 pages}

Now, take your scoring tool {Be sure it is NOT the cutting blade...trust me, I've done it :( } Score along the small cuts the Cricut created for you. There are 4 total on the cover and 1 each on the pages. Don't push too hard, even the scoring tool can rip your papers. Just use enough pressure to put a small indented line where you want it.


If you are going to ink the edges, now is the time. It is going to be too difficult once the book is put together. I used Color Box's Black Bird ink.

Once you have inked, fold the cover and pages on the lines you have scored.

Now, take all the pages and put them in the order you would like. Mine are all double sided, so I took a few minutes to coordinate them all together in the order I wanted them. Once you have them folded together, you are going to want to line them up between the thinner, smaller scored lines in the book. Be sure that if you are going to have the traditional book-look, that your papers are right side up. See what I mean?

Now we are going to staple the book together. Here is a little trick a Junior High School teacher taught me. If your stapler is not long enough to reach where you need it staple (and mine wasn't), line you papers up the way you want them, paper clip them in place if they are slipping and won't stay put. Now, find a table or space where there is a small, straight crack. I use my dining room table where the leaf is in it. Make sure the crack is only about 1/4 of an inch wide. Place your booklet, where you are going to staple, right over the crack, then take your stapler, open it up straight and push the staples straight down through your papers. Be sure to center them so you don't get your table or counter or whatever you are using. Once the staples are in, turn the booklet over and your staples will be sticking straight up. BE CAREFUL! Take a Popsicle stick and gently push the staples down. There you have it! Staples are in place and your book is now tightly put together.

Now, you can fold your matchbook up and make sure everything fits nicely together.

When you open the book, this is what you will see, your first page. {You do not have to have your book open this way, it can stand straight up just like a real matchbook, I wanted my to flip right to left like a real book though. Play with it and see what works for you}

Now, time to decorate! The fun part! °Ü° Measure your papers out and cut them to size. Adhere down the front cover, back cover and spines.


Now, time to decorate! The fun part! °Ü° Measure your papers out and cut them to size. Adhere down the front cover, back cover and spines.

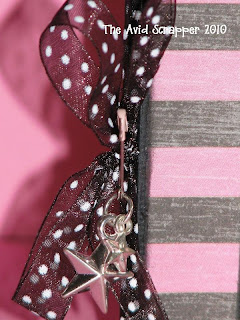
To cover the ugly staples, I took 20" of ribbon and tied it around the center of the book and tied a bow on the outer spine, covering them up. Adds a little something fun, too. Yes?


To the ribbon, I added two silver toned stars and pinned them with a baby safety pin. More fun...

Here's the spine.

The back is just decorative paper. I thought about adding more, but really liked just this.

When you open it, this is what you see. I added the skull and cross bones with a fame to the inside. I thought it pulled all those cute Pirate Princess papers together.

As you can see, I haven't add photos yet. I am going to have my daughter help me choose the photos she wants in here and then we will embellish all the pages. Because each and every page is decorative, it will be quick to get the photos in, add some brads, ribbon, and die cuts from the Indie Art Cartridge.

The "Rock Star" is a stamp that I stamped on pink textured card stock and cut out. Using 3D pop dots, I adhered it to the front. 3 pink star shaped brads were also added.

Here's the spine.

The back is just decorative paper. I thought about adding more, but really liked just this.

When you open it, this is what you see. I added the skull and cross bones with a fame to the inside. I thought it pulled all those cute Pirate Princess papers together.

As you can see, I haven't add photos yet. I am going to have my daughter help me choose the photos she wants in here and then we will embellish all the pages. Because each and every page is decorative, it will be quick to get the photos in, add some brads, ribbon, and die cuts from the Indie Art Cartridge.
So, there you have it! If you've got a couple of hours and want to make a cute project for yourself or someone you know and love, this is a fun one! Let me know how you do... °Ü° I would love to hear about themes, papers and the different ways you come up with making your very own matchbook brag book!
HAPPY SCRAPPIN' °Ü°
3 comments:
So amazing as always!!! I have been debating on the Indie Art cartrage, but now I think I better get it. What line of stamps are the Rock Star stamp you used?
I'd still love to see pictures (or maybe even a short video?) of you actually chalking/inking your projects. Mine never seem to turn out like yours, and I'm wondering about your technique!
Brandy, you gotta get the Indie Art cartridge. It is so fun and has the best images for teens and boys. I know there aren't a lot of "manly" cartridges, but this one is. I am doing some of my high school pages for the late 80's with it.
The stamps I got at JoAnns and they are made by Inkadoo. I threw out the packaging, but if you have a JoAnns there, they are in the stamp section with a green header. You might even find them on-line.
Carrie, I do plan on doing some type of a tutorial with pics or video, it may be a couple of more weeks. I will need my daughter's help and she has been busy working two jobs. There are so many looks you can get by inking and I do want to share how to get all the different kinds with just a simple flick of the wrist and pressure applied to the ink pad. Look for it soon... it is at the top of my list! °Ü°
Post a Comment