Friday, December 31, 2010

{Happy New Year!}


Happy New Year to all of my fellow scrappers! May 2011 bring you joy and happiness, a closeness to those you love most, patience for those who try you, time for all the things you enjoy, health for you and your family, peace in your hearts, and most importantly, plenty of scrapbook supplies! °Ü° Have a safe night and great start to your New Year!
May we all get our SCRAP on in 2011! °Ü°

Tuesday, December 28, 2010

{Wreath Christmas Card}


Of all the cards I made this Christmas Season (and there were tons!) this one was my favorite. I used the Storybook cart and cut 30 of those little bushels. I then cut a 3.5" circle and glued down just the tips of them going around in circles. Of course, I inked them all before doing that. I also used 3 different colors of green to give it a realistic look. I glued down tiny jingle bells and a bow. Red Stickles were used for the holly berries. I inked and distressed the edges. Used a gold book plate and stamped "Noel" and then stickled it. 3 pearls and some ribbon and I had surprised myself with this card! :)

ALL IMAGES PROPERTY OF THE AVID SCRAPPER
COPYRIGHT 2010
PLEASE DO NOT COPY

Friday, November 5, 2010

{Thank You Card}

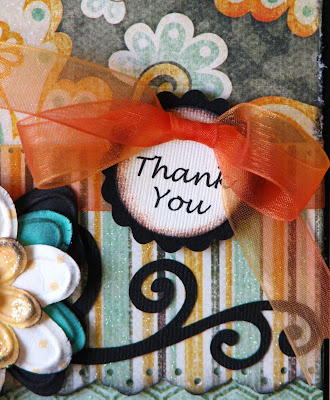
My daughter has an amazing drawing teacher at school. She recently gave me a really cool scrapbook organizer that she didn't have use for. I love it! It is really handy for teaching my classes and projects on the go. I was grateful that of all the people she must know, she gave it to me. What a sweetheart, huh?

I made her this Thank You card for her kindness. I love this stack! My Mind's Eye. What an amazing paper company. I love them and the paper was perfect for what I had in mind.


The card is a 5x7 and I had so much fun using all of mine and my daughter's punches to design the cascading effect on the front of the card. I really love card making! I wish I did more of it, but the fact of the matter is, that if I scrapped AND made cards as much as I truly wanted to, I would never do anything else! :D Showering and a clean house are important, right? LOL °Ü°

{Baby Boy 12x12 Layout}

Those of you who peeked in on the blog earlier this week, say the Baby Girl page I did, similar to this one. After finishing the sweet girly page, I decided to make a Baby Boy one, too. Using the same layout, I came up with this:


I cut the photo mat differently using a different marquee cut from Storybook. I thought it should be a little more masculine that the Baby Girl's mat.


I did cut the same flourishes, from the Stretch Your Imagination cart. I used Prima Flowers, but no BLING. Instead, I used buttons. Cute, huh?


This little outfit is made from baby blue material. How stinkin' adorable is it? I knew I had been saving it for something! °Ü°


There are 10 Prima Sprite flowers in all, layered to create 5 flowers total. The centers are buttons, 3 of which have ribbon tied into a bow.


There is a little terry cloth, sewn whale, too. He is so cute!


19 glitter embossed stars decorate the brown border.


I used 3D Pop Dots on the outfit, the whale, the blue photo mat and brown starred border. Lots of dimension!


Like the girl layout, there is white strip of Bazzill card stock for journaling all about your adorable baby boy! Also, the mat on this one is a tad bigger, so it will easily hold a 4x6 photo, or if you like, you can trim about 1/2 inch off of each side of a 5x7 to fit on the mat.

How perfect is this for displaying a new born photo, blessing or baptism photo. It can be framed in a 12x12 shadow box frame or makes a beautiful first page to your little guy's memory album!

Making cute pages like this makes me wish I had a son... I guess I can look forward to grandsons one day...right? °Ü°

This item SOLD on Etsy...

Wednesday, November 3, 2010

{Featured °Ü°}


I am feeling very honored! Did I tell you that I was featured on the Fantabulous Cricut blog this past weekend? I was! °Ü° Those of you coming from the site know this, but those of you who have been with me for a while may not.

Lori, from over there, wrote and asked if she could feature me. This is only the second time this has happened and I was excited and nervous all at the same time.

It really is a great blog! They have all kinds of challenges and tips and tons and tons of Cricut creation ideas! Check them out when you get a minute, it's a fun site to visit! Oh, and the talented girls who run the blog are so nice and helpful!

Thank, Lori! It was a lot of fun. You did a great job of making me look good! :D

Oh, and did I mention? I will be donating a spread for a free giveaway over there soon, so I will keep you posted...

{Baby Girl 12x12 Layout}

I know that with this economy, it is tough to spend $45 on scrapbook pages. At the same time, I realize not everyone has the time to create their own with all the working going on! So, I will be creating some 12x12 layouts AND I am dropping the price from $26 to $22 for each. ($20 is for the layout, $2 goes to covering my sales fees) I am hoping that this will help with building your albums and help me with sales. Win-Win... yes? °Ü°

Here is the first of many of have in the works. It's been a while since I worked on a baby page. I sometimes get really tired of working with the same colors, so the soft pink, brown and white was a nice change from my recent creations. °Ü°

This layout is so perfect for newborn pictures, blessing or baptism days, I could go on and on...


The background is brown Bazzill paper, layered on top of that is white card stock that has been punched with a decorative edge. On top of that is the cute white with pink polka-dotted paper.


It will host a 4x6 photo perfectly and as always, your photo will slide easily behind the flowers around the frame.


There are 11 Prima Sprites flowers layered to created 5 beautiful flowers to frame in your photo. In the centers of the flowers are clear gemstones; round and square. They are stunning!


Also on the page, is an adorable rattle that houses little soft pink, seed beads. It has a cute little pink bow tied to the rattle handle.


The largest of the flowers is layered with 4 Prima Sprites. It's gemstone is the largest on the page.


There are 2 brown flourishes that accent the flowers. I love they way they came out!


The flowery brown border has 18 flowers, all with small gemstones as the center. There is a lot of BLING on this pages! The "baby girl" is embossed with glitter glue.


Here you can see the dimension on the page. There is quite a bit of it. The flowers are all popped up with 3D Pop Dots, as are the brown border and photo mat.


All-in-all there are 24 gemstones on this page. Also, the white strip to the right of the photo mat is for journaling. I left it simple so that it can be personalized, either with writing, stickers, letters or so on.

So, what do you think? 12x12 layouts... a good idea?

This item listed on Etsy...

Saturday, October 16, 2010

{Disney Class "WHAT A BUNCH OF CHARACTERS" Scrapbook Pages}

So, I have finally gotten around to taking photos of my next Disney Class's pages. I don't know why, but that part always slows me down. :(


The entire spread


Left Page


Right Page


Donald, Daisy, Mickey and Pluto make up most of the title.


Up close to each of them. I didn't want to have to layer and glue down more words that we needed to (especially since we have 5 characters to put together PLUS part of the title) so I printed these on cardstock, inked the edges and layered them on black cardstock.


The rest of the title. Cut letters, layered on a white shadow and popped up from the page with 3D pop dots.


Here's Goofy. I just love him! :) The circle can be used for journaling. I thought it might be fun to go around the edges and then fill in the middle, too.


This spot if perfect for smaller photos. The 4 white circles can be used for anything. I am going to use mine for the year.


The others got a close up. Goofy should have one, too! :)

So there you have it. What do you think? It really is a colorful page, and I love it! Excited about the class coming up. See you all then!

Tuesday, October 12, 2010

{Hello BOO Kitty Halloween Scrapbook Pages}

How cute is Hello Kitty? I have had a fascination with her since I was 7 or 8. There is just something about that little face of her that draws you in and hooks you! :D


I think this is the first Hello Kitty spread I have finished. I am so excited about the way these pages turned out! Rarely do I plan layouts and have them turn out exactly as I saw them in my mind. A rare phenomenon, I tell you! °Ü°

Again, this is one of my "freedom" pages, because as you will notice, no photo mats. This gives you the choice of 5x7 down to the smallest photos you can imagine. PLUS, you can arrange them any way you choose. I love that! ♥


The entire spread.


Here is page one...

And here is page 2!

This little bat and moon pop right off the page. They are accented with glitter. How cute is he?

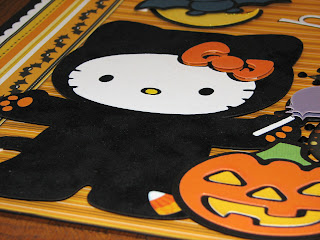
Hello Kitty stands about 8" tall and her costume is cut from faux black suede, so she is fuzzy just like a really black kitty should be! She also pops off the page.

Here you see some dimension. Her bow and purple sucker pop off the page as well. Both are cut from glitter card stock.

Mr. Pumpkin is cut from glitter card stock, too.

You know how I loved flourishes, I had to put one in.

Here is the piece that ties the two pages together. It is shimmery and also has glitter spots on it. It need some more BLING so I outlined it with more than 50 black gem stones. I love the effect.

Here is the second part of the title. "Hello" and "Kitty" are cut from white glitter card stock. The "Boo" is cut from lined black card stock and pops off the page.

So, on the Hello Kitty Cricut cart, there isn't a Hello Kitty witch like this one. They do have one, but it wasn't the one I imagined when planning the pages. This hat is found on the Happy Hauntings cart and so I cut it and attached to Hello Kitty's head. I can't believe how cut it is. It looks like it was designed just for her!

The hat is inked and her band and buckle are glitter card stock, of course! °Ü° I also added yellow glitter to buckle for more texture.

She also is a journaling tag! Yes, just pull her hat up and she pulls out to reveal a spot for journaling. Her hands stay put and the tag is attached so that when you slide her back in, her chin fits nicely over the paper.
The papers are all a little different, which brings great texture to the pages. There is heavy card stock, shimmer paper, glitter card stock and textured card stock.

This was such a fun page to create! Can't wait to get more done!


Designed and Created by CJL
The Avid Scrapper 2010

Please do no copy for resale. Thank You.

This spread is still available for purchase!  Not in my Etsy store so please contact me, personally, via email. Cost is $45 + Shipping

LinkWithin

Related Posts Plugin for WordPress, Blogger...