Monday, October 11, 2010

{Strawberry Shortcake "Cutie" Scrapbook Pages}

It's been a while since I made a SS spread and I was missing this cute little face! °Ü° Once I finished, the only thing that came to mind for the title was simply, "Cutie". What a cutie she is!


The Entire Spread

Strawberry Shortcake stands about 10" tall


I love her little basket


Cute little flower gem with ribbon. Your picture will easily slide under the ribbon.


4x6 Photo Mat


2 More Photo Mats, embellished with gems


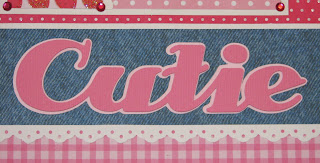
The Title. It has a 3D effect. The darker pink is popped up from the light pink shadow.


A Place for Journaling


I love this Strawberry die


The daisies have glitter on their petals and are popped up


I just love this sweet little face


Both SS images have button strawberries with gems in their bows


Gemstones! You know how I love them!

Some of the papers are embossed with glitter and really add dimension to the pages. There are lots of 3D pop dots. too! I just love SS. I don't think you can go wrong when she on the page! °Ü°

Designed and Created by CJL
The Avid Scrapper 2010

Please do no copy for resale. Thank You.

Watch for this page to be listed in my Etsy store soon. If interested, you can contact me via email. Cost is $45 + Shipping

Sunday, October 3, 2010

{Kylie's Halloween Cards}


I am lucky to have 2 very talented daughters. My oldest takes after my love of crafting and painting, and my youngest takes after my love for writing, drawing and journaling.

My oldest, Kylie, loves making cards and I envy her ability to create them so easily! I am a product of the 80's. Everything was very matchy-matchy and symmetrical. It is how I dressed, arranged the furniture in my room, it was in everything I did in Jr. High and High School and it is pretty much the same for me today. I am sure some of you have picked up that little fact in my pages! For Kylie, crafting, scrapbooking and card making is more care-free. She is really an artsy person. She is a photographer and sees the world a bit differently than most. (BTW, I wish I had just an ounce of her photography talent, too!) Anyways, back the cards, she has got a jump on her card making for the season and here are her first 5 Halloween cards. I just loved them and had to share them with you. Hope you are inspired, I know I am. Now maybe all the cute Halloween paper sitting here next to me can get put to some good use!

Happy Scrappin' °Ü°

Friday, October 1, 2010

{TP Roll Halloween Brag Book}


Yes, you read the title right. TP, as in toilet paper. I made the above brag book out of toilet paper rolls. Crazy, huh? A couple of months ago my daughter Kylie was surfing the web for new album ideas and she found someone who made these little albums. She made the most adorable one for a friend and I fell in love with it and the idea. I've wanted to make one ever since.

I'm not sure I've ever said this, but I am a Bo Bunny-a-holic. I love all things Bo Bunny. I think they are an amazing company who get's today's crafter and makes a product that is loveable, useable and reasonable. A few weeks back, I bought the Bo Bunny WHOO-LIGANS line. It's been sitting on the corner of my scrap desk just staring me down and waiting to see what I will create with all of it! °Ü° I do have plans for it, but I thought it would make the perfect little TP album given that I wouldn't be using a ton of it.

So, I gathered it all together, and my TP rolls, 5 of them. First, I took the rolls and flattened them out really good.


Don't worry if they aren't totally flat, because as you can see from the pic they don't go completely flat until you paint them. I didn't get any pics of that part of the process, but I just took some black acrylic paint and and brushed it on each roll, first one side letting it dry and then the other. Once they were completely dry, I smashed them flat and they cooperated!


Now that that part was over with, it was time for the fun part... creating! Here's a look at all the pages:


The Back cover


Once I got all of my pages done, I created 5 tags, one for each roll. They slide right into the open ends of the album. I love that!


So that's it! Like I said in the post below, I would have never thought of using TP rolls to create an album, but how great is it to Scrap GREEN? I it! Plus, it's an easy and fast project. Took me about 4 hours, but now that I know what I am doing, I am pretty sure that I can get the next one done in under 3.

So, let me know what you think about it; Weird? Crazy? Cute? Would you make one? I'd love to hear what you think!

{October...Already?...Really?}

Wow! Where has the year gone? I can hardly believe that it is already October. I feel like I've missed something! The thing is I've done so much this year, especially this summer so it's not like I've been doing nothing all year. I guess it is typical for this time of year. Always seems to sneak up on me a little too quickly.

Speaking of sneaking up on me, did you know that Christmas is 85 days away? Yes, Christmas Eve is just 12 weeks from today. Just sayin' °Ü°

Okay, so now that you are totally panicked and I have your attention, did you know that tomorrow, Saturday, October 2nd is WORLD CARD MAKING DAY? I'm really excited. I plan to spend the whole day getting a head start on all of my Christmas Cards. I have two layouts I am going to be using. I have over 100 friends and about 40 family members on my Christmas card list. Yes! That is a lot of cards. I usually just purchase photo cards from Costco, but after cleaning out all of scrapbook supplies and going through each and every sheet of paper, I realized that I have nearly 1,000 sheets of Christmas paper. I really need to get it used up and thought this would be a great way to do just that. I've always held off making my own cards each year because I know I will want to do it every year. Who knows, maybe the stress and enormity of it all will put me off for next year. We will see. °Ü°

So, I just finished a really cute little Halloween brag book. You will never guess what I made it out of. I would have never thought it would be something I could use in scrapbooking, PLUS it's a great way to recycle something we throw away nearly every day. You will just have to wait and see! I just need to take some photos and get it posted. I will do my best to do that today.

Happy Friday, October 1st to you!

Saturday, September 25, 2010

{Halloween Coffin Treat Boxes}

Looking for a quick and easy Halloween gift? This is it! Such a cute little treat. °Ü°


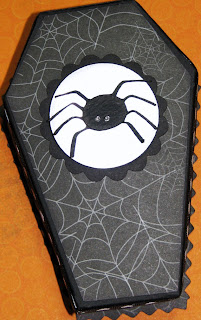
I wasn't feeling very well today and so I spent most of the day in bed. :( After dinner, I still wasn't feeling my best, but I couldn't go back to sleep, so I pulled a chair up to the Cricut desk and grabbed the Happy Hauntings cartridge. I thumbed through the booklet and came to the page with these adorable coffin boxes on it. After debating, I finally decided to give them a go. I got out some black card stock and scrap Halloween papers and started cutting. I started small, with the Witman Sampler boxes in mind, and cut each one at 7". Once I got the shells put together I cut the decorative scraps that I had. I added ribbon and cut some embellishments and before I knew it, I had two very cute little candy boxes ready to go! I am really excited about these. My daughters want to make some for friends, family and teachers. Now that I know what I am doing and have all of the dimensions down, it should be easy to create tons more. If you have the Happy Hauntings cart, you've got to try these! You will ♥ them and so will everyone you give one to!

The fnished box was almost 5" long and almost 3" wide. I filled them with candy kisses and was able to get quite a few in there. Just make sure you are cutting with thick card stock. The candy does add lots of weight and anything thin will not hold up.

Happy Scrappin' to ya! °Ü°

Friday, September 24, 2010

{Diaper Cake}

Last month, I attended a baby shower that our youngest daughter and her friends threw for one of their Young Women's leaders at church. The day before the shower, we realized that we had no real center piece for the serving table! Somewhere in the deep reaches of my mind, I remembered seeing a "cake" made from diapers and immediately hit the YouTube website. I found a simple instructional video on how to construct a DIAPER CAKE. (I chose this one because it was simple and completely do-able) It is crazy to me what some people can come up with! Amazing, really.

So, after 10 minutes or so on YouTube.com, me and my daughter headed out to Target and Micheals. We bought size 2 Pampers, Ribbons, pacifiers, wooden dowel rods, Wilton Silver covered cake platter (scalloped edge) and rubber bands.

We got home and started rolling diapers and rubber-banding them just like the video said. Got the diapers into the layers, put 3 dowel rods down into the 3 layers- careful not to tear any of the diapers and then put on the ribbons, bow and pacifiers. I kid you not, it only took 1 hour and 15 minutes to make this cake! Seriously, the easiest and cutest project I've ever done. I wish scrapbooks were this easy! °Ü°

Your next baby shower, you've got to try it. The breakdown in cost:

  • Diapers $20
  • Ribbon $6
  • Pacifiers $ 2
  • Dowels $1
  • Cake Platter $1
  • Rubber Bands $1
Keep in mind, because it was a last minute thing, nothing I bought was on sale, but for around $31 dollars and a little time, we had a great center piece and it ended up being the actual gift that my daughter gave the mommy-to-be. She was so excited about it, she loved that the she could keep it up in the baby's room for a bit before having to tear it down to use the diapers. Shop around, buy less expensive diapers, get your ribbons on sake and you can decrease the cost of this project considerably!


How cute is that? Can't wait to go to another shower! I have so many ideas for my next one. I think this will be my staple gift for showers from now on!

LinkWithin

Related Posts Plugin for WordPress, Blogger...